Saturday, April 26, 2014

Rifle Ramblings

So, if you are reading this you know I was born in 1964 like the old truck.  But, you may not know I was born in Germany.  My dad was stationed there with the Air Force.  So, here's a story relayed by my dad.  My mom, dad, sister and me were coming back from Germany after the overseas tour.  We were in the airport and dad was holding his two most precious soveneirs from Germany.  One was a Browning Model SA-22 Takedown Rifle in a leather carrying case and the other was a screaming toddler making everyone around him miserable (Yep, it was me).  Dad says he finally got to the ticket counter and the guy at the counter asked, "What's in the case?"  Dad said, "It's a gun."  The guy behind the counter didn't even bat an eye because he was tired of the screaming toddler, he said, "Yeah right, come on through."  So, dad carried his toddler (me) and a .22 rifle onto the airplane and stowed the little case in carry on luggage.  Can you imagine this in our Post 9/11 world?  Yeah, me either.

I tell this story because I was recently back home and told dad that I was looking to buy a Browning SA-22 like the one he brought back from Germany.  He said,"Let me show you something."  He pulled out a look alike Browning he had recently bought.  It was in pretty rough shape, but he said I could have it.  I brought it home and took it out to my range to see how it performed.  It jammed on every shot.  I knew this was a great gun, so I started to restore it to its former glory.  First, I disassembled the whole thing.  I used a razor blade to scrape away lead, powder residue and general gunk from inside.  After a couple of hours of cleaning the mechanism looked and functioned great.  But, I decided to restore the stock and forearm too.

I started by strpping all of the old finish from the gun.  I used a toothbrush to get into all of the checkering.

You can see the scratches and dents in the old finish.
The old finish had a lot of deep scratches and bruises.
There was even a crack in the forearm that I was able to fix with fiberglass epoxy resin.  I used a great technique, but didn't take pictures of it, sorry.  But, here's what I did.  I took a towel and soaked it in water.  I squeezed out the excess water, laid it over the wood stock, then took a hot iron and ironed the wood through the towel.  So, the iron turns the water in the towel to steam.  Then the steam plumps the wood back up removing about 80 percent of the dents.  This reduces the amount of sanding required and saves more of the wood.  In other words, you don't have to sand as much of the stock away to get to the "good wood".  It worked great, you should try it.  It should be included in the list of life hacks!

I used Tru-Oil to finish the stock.  I would add a very light coat, the let it dry.  The next day I would go over it with fine steel wool, then add another light coat.  I ended up with about six or seven coats.  The end result turned out great.
Now, I have a great little rifle to remind me of my childhood and that cool story about the time my dad took a gun on a commercial airliner, what a hoot! 


Thursday, April 24, 2014

Transmission transition

Today, I made a lot of progress.  Once the engine was in the frame, it was time to install the rest of the drive train.  So, we start at the crankshaft and install the flywheel.  Remember, this is the part we worked on in the video.


Once the flywheel was on and torqued to 50 lbs it was time for the clutch. Now, the clutch is centered in the pilot bearing with a little plastic tool.  It's called a clutch centering tool.  Hmmm.  That makes sense.  Engineers are very smart, but not very creative.

Then, the pressure plate goes on.  Notice the clutch is still centered with the little tool.

I know what you're thinking...  You're thinking, "Oh my gosh, what comes next?"  Ok, calm down.  I know you're getting excited about all of this, but I don't want anybody to hyperventilate.  So, next is the bell housing.


Then, the transmission, Bam!  Sorry, just wanted to say Bam!  Next episode we start adding oil to the engine, install spark plugs and get this beast ready to crank.  Stay tuned!


Wednesday, April 23, 2014

Phun with Physics


Ok, boys and girls it's time to have fun with physics.  The flywheel on the HOT truck have some missing teeth.  So, this means when we try to start the engine it would very likely just grind instead.  So, I decided to replace just the ring gear.  A new flywheel costs $150 and a new ring gear was $15.  We can all do that math right?   OK, let's learn something...

Phun with Physics

Phun Phact, right after we shot this video the ring gear seated on the flywheel within seconds.  It is interesting to me that there is so much force introduced by the starter and transferred to the flywheel through the ring gear without anything holding it there.  I'm sorry, it is Amazing to me!

Next, I had to get the left front brake squared away before I could put the engine on the frame.  Once, the brake is done, I can roll the frame back outside and mate the engine to the frame.  Here is a shot of the brake before any work was started.

 And, this is what it looked like after everything was cleaned up.  Lori wanted to know why one of the new springs is green...  Everything is green in the spring, duh!  


Next, we put the engine on the frame!  

Tuesday, April 22, 2014

Smurf Engine

I really can't believe that anyone reads this blog, but I sure have had a lot of requests to keep posting.  We've been traveling quite a bit, but now we're back home and working hard.  

Well, I got the pistons in only to find that they were trying to escape from the block.  When the number one cylinder was Top Dead Center (TDC) it stuck up above the block above 75 thousandths of an inch.  That's not good since the head is a flush fit.  So, we had to get new pistons that were about a quarter inch shorter.


Practice makes perfect.  I had to install the pistons twice.  Then, it went back together quickly.  


Here it is largely assembled and prepped for paint.  I am told that the old Chevy straight sixes were painted Chevy Blue, not orange as I had thought.

So, here's the Smurf engine!  It's not easy being blue...  Or is that green?  Anyway, I'm about ready to put it back on the frame.  More to come! 


Monday, March 10, 2014

Fried Coleslaw?

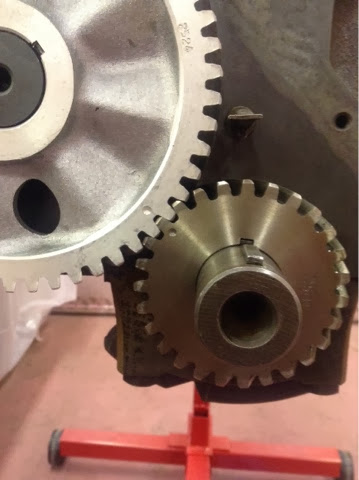
Years ago, Lori and I wandered into a little cafe in the deep south.  We thoroughly examined the menu and finally the waitress came.  She was mauling the bubble gum she had in her mouth, she said, " Can I help you, honey?"  Lori asked, "Do you have anything that's not fried?"  The waitress didn't even slow her cadence with the gum and said, "Oh baby, we fry everything here but the coleslaw."  Now, I only tell that story because I thought about it as I was working on the engine today.  You see, I had to install a gear onto the end of the crankshaft.  The gear has to be heated all the way through and then tapped into place once it is heated and expanded enough.  I am told that heating with a torch will not evenly heat the part and may not allow for even expansion.  The answer?  Fry it!  What?  That's right, take some plain engine oil, heat it to boiling and fry the gear in it.  That way the part heats evenly all the way through.  So, I broke out the Coleman stove and fried up some engine parts.


How do you like your gears fried?


Here's the finished product once the gear was tapped into place on the crankshaft.  Tip, boiling engine oil will burn you if it makes contact with the skin.  Just saying.


Did you see the Dexter table in the background?  You can see the engine is dismembered and positioned for reassembly.  If you've never seen Showtime's hit series Dexter, then the reference was lost on you, sorry.


Ain't it pretty though?  Who knew old truck parts could be such a work of art...


Here the crankshaft is back in.


See the two dots that line up?  This ensures the timing of the pistons and valves.  If they don't line up, you'll bend a valve when the piston and valve collide.


Remember the picture of the valve that was all jacked up in an earlier post?


Here's the same valve now.

Ahhh, that's much better, huh?  Well, the engine is coming along nicely.  Hopefully, we will be hanging this thing on the frame soon.  Stay tuned.


Saturday, March 8, 2014

Plane Bored in Retirement

The following article was written and submitted to the EAA Chapter 1423 newsletter. I thought you might enjoy it here, too.

I've been building airplanes for the last sixteen years.  In that time, I've built and flown an RV-6A, an RV-10, and more recently an RV-12.  Now, don't get me wrong, I love building and I certainly love flying.  However, don't you sometimes get bored doing the same things over and over?  Me too.  So, recently I've sidestepped a little and taken on some non-aviation projects.  First, there was the motorcycle that was going to be my 2013-2014 winter project.  The guy I bought it from had already thrown up his hands in defeat.  "We've tried everything,"he said.  "It doesn't have enough compression so it will have to be rebuilt."  Cool!  I get to rebuild another motorcycle.  I did one last winter and it was fun.  So, I got it home and prepared to pull the engine.  But first, I thought, "Well, they have checked everything, but I'll just confirm their findings."  So, if the compression is low, let's check the valve clearance.  They were WAY off.  Come on, that can't be it?  I checked the compression, perfect...  So I buttoned everything up and hit the starter, vvvrrooomm.  Started right up.  My winter project lasted almost two hours.  Oh well.


Then, I started thinking that I'm about to turn 50.  So, I want a theme project.  You know, one that's 50.  I found a 1964 Chevy C-10 Pick-up.  Rusted, broken down and on its last leg.  Like me!  So, my son-in-law, Matt, and I took on the project and we have been having a blast!  We've stripped it to the frame, ripped the engine and transmission into a million pieces and have already started to put things back together.  We decided to blog about the process.  I know, old dogs and new tricks, etc. but, you can check it out at upsugarcreek.blogspot.com .


Meanwhile, on the airplane front, I had another project fall into my lap.  A Glastar GS-1 that has languished for years as a project found its way to us.  It is partially completed and the work that has been done is largely un-airworthy.  So, we will need to rework a lot of parts but there's nothing that can't be fixed.  So, the GS-1 is next in the queue behind the old truck.  And, next will be the RV-8 that is still in the box, but that's a story for another time.  So, we have the next several year's worth of work already laid out for us.  Meanwhile, Lori and I are enjoying a globetrotting lifestyle of doing aircraft builder's assistance.  We are headed to New Orleans to help an RV-14 builder who is stuck building his fuel tanks.  Then, up to Wisconsin to help an RV-8 builder finish that last 90% before first flight. Then, it's off to Sun-N-Fun.  Finally, back home and back to work.  And, people ask me every day, "What do you do now that you're retired?"  I look them right in the eye and say, " Oh, nothin'!"


Thursday, March 6, 2014

Give Me A Brake!

Sorry for all of the puns, but I just can't stop.  Get it?  Brakes, can't stop...  It's a sickness really.  Anyway, I started on the brakes tonight since it's easier to do when we're down to the bare frame.  
The spindle looked fine (shiny thing in the middle), but everything else needed help.  Step one, pull the brakes shoes and springs out of the way.

Then, we end up with this.  

Then, some quality time in the blast cabinet and some paint and BAM, good as new.  I had to stop for the night, but tomorrow we will get it squared away.  More to come.